I’ve got this problem: I’ve got a bass guitar kit that has been sitting in my closet for a huge amount of time (it’s embarrassing) – and I really want to put it together. So I’ve been working on learning about luthery (I even started a blog about it, but then killed it since I’m such a n00b) and I’m really stunned by how much awesome information is available on jigs, tools, and techniques available. But I have a second problem: I don’t want to spend a lot of money and a lot of time making radius dishes, which are useful for making guitars, but I’d need to buy two of them, and I don’t really want to spend ~$100 per dish on a new one. So I thought for a bit. I examined what I needed, what I knew about materials, and what would help me get a radius dish without having to spend so much money (you need at least two for most guitars). What I’m sharing here is an experiment that looks to accomplish ‘radiusness’ while also being a wee frugal and to my knowledge is untrod territory.

The starting radius dish circle.
Here you can see the dodecahedron (12 sided polygon) that I started by cutting a 24-ish inch polygon. This will create the perimeter that my peg board will rest on and be stretched into it’s radius’ed shape with. The pine is 2.5″ tall and it’s resting on a laminate piece of MDF that I got for a song at Ikea ($1.99? yes please). The bevel on the ends is a 105º cut. Collectively it gives me about 77 inches of perimeter. I’d like to cut them down just a touch, but that changes the geometry. The middle of the radiused dish needs to be recessed down a mere 0.3 inches to create a 24 foot radius.
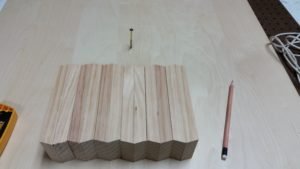
The Sides and the center screw on the laminate
So I cut the sides (as you already saw) and found the center of the piece of laminated MDF and then needed to mark my perimeter (just in case that would help me visually). So I tied a string to the screw in the center and used the pencil to trace out a 24″ diameter.
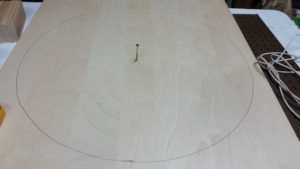
the 24″ diameter
Then, with great fear and trepidation I put the 12 sides up and placed the screw through the center whole.

The screw through the center hole
The sides have not been glued or anchored in any way other than through the natural tension provided through the pegboard.
I placed my level over the pegboard and measured down the 0.3″ (5/16) with my combination square and carefully screwed the screw into the laminated MDF.

The combination square over the level
You can see the end result here with the level floating over the slight concave of the radius dish.

The Radius with the Level over it
After all of this I used one of my screw counter-sinks and carefully by hand pulled out enough material for the head of the screw to be counter-sunk.
the counter sink
And now – I have to sleep – so I won’t know how well this works until later this week when I get a chance to work on this and use it. The good news is that it appears to be stable (even without anchoring the sides) and pressing into the dish seems to be somewhat firm (with only a tiny bit of give). With the sanding paper I bought I’m hoping to get a nice clean bracing and then that will help with the go-bar deck, which I will have to work on next 🙂
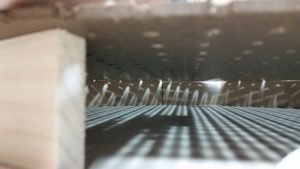
From inside you can see the bow